This guide will teach you everything you need to know about preventing a crash or flyaway with your DJI Mavic, Phantom, or Spark. If you follow the advice in this guide, you will learn how to fly your DJI drone safely and will greatly reduce the chance of a flyaway or crash.
The tips have been organized into the following categories to allow you to easily jump to a section of interest:
Below is a complete list of tips that'll be covered in this guide. Either scroll down to start at the first tip or click a specific tip to jump to that section of the guide.
Before attempting to fly your DJI drone, here are some important things you should know:
The DJI drone manuals are full of great information and a must read if you want to have a deep understanding of how your drone works. The manuals are only available in PDF format and must be downloaded from the download pages in the following sections of the DJI website:
Take the time to carefully read the manual in its entirety and learn all of the features and functions within. And read it a second time if you don’t feel like you’ve understood everything the first time around.
If you have any questions about anything in your DJI drone manual, please ask for help in the DJI Drone Help forum. I’m there 7 days a week (along with many other DJI drone owners) and it’s a place where you can be sure you’ll receive expert and accurate information about your DJI drones.
The battery level indicator is displayed at the top of DJI GO (see the screenshot below). It shows the current battery charge level and when it’s expected to reach the low battery and critically low battery levels.
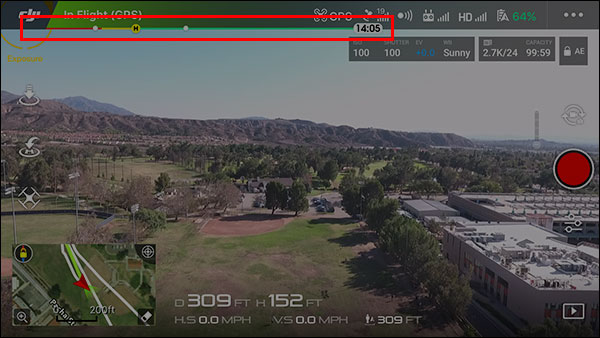
It’s important to understand when the battery is going to reach these levels since the drone is programmed to return to the home point or auto land at those points.
Watch this video for an explanation of how to use the battery level indicator in DJI GO.
DJI GO contains Low Battery Warning and Critically Low Battery Warning settings (see the screenshot below) that allow an alert to be displayed in DJI GO when the current battery charge level reaches those percentage levels.
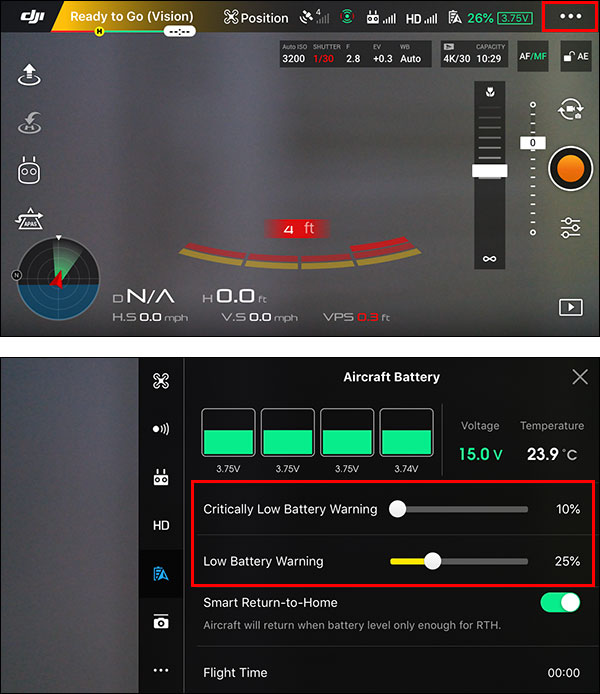
These settings do nothing but display an alert in DJI GO when the battery percentage reaches the set levels. They do not control when the drone starts returning home or auto lands.
The actual low and critically low battery levels are determined by the drone’s current altitude and distance from the home point and are continuously recalculated throughout the flight. Use the battery level indicator at the top of DJI GO to monitor the battery level and ensure you’re able to get your drone back to the home point by the time the low battery level is reached (or at least before the critically low battery level is reached).
The RTH feature is one of the most complex features of a DJI drone. While it works very well and rarely fails, it can do unexpected things if you’re not sure how it’s supposed to work.
Here are some important things to know about RTH:
There are many other possible scenarios that could occur when RTH is initiated. Carefully review the RTH section of your DJI manual so you fully understand what to expect.
Batteries and props are the most important drone accessories since they are the two pieces of hardware that are most often involved in drone crashes. While OEM DJI accessories always cost more than 3rd party accessories, they are known to work very well and they will last a long time if you care for them properly.
If you choose to use 3rd party props or batteries while your drone is still covered under the DJI warranty, your warranty might not be honored if you attempt to make a warranty claim and DJI determines the props and/or battery was to blame. 3rd party props are usually not made as well, are often responsible for erratic/unstable flight, and have shattered mid-flight in some cases.
If you purchased a used drone or a drone from a seller that is not an authorized DJI dealer, you might have 3rd party props or batteries if your drone came packed in an unsealed box or came with extra props and/or batteries. Inspect your accessories carefully to ensure you’re using OEM DJI parts (if that’s your goal).
You can match your accessories up against the accessory photos in the DJI Store to figure out if they are OEM DJI parts. Carefully comparing the photos side-by-side is usually enough to figure out whether or not your accessories are genuine.
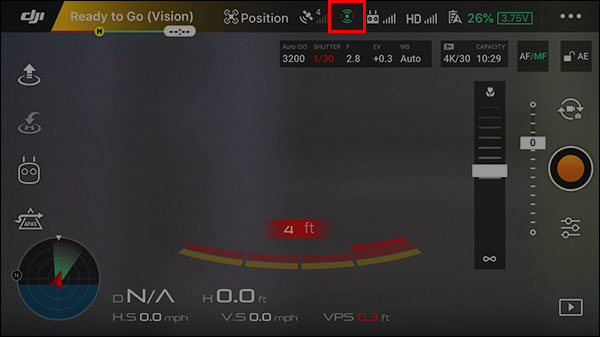
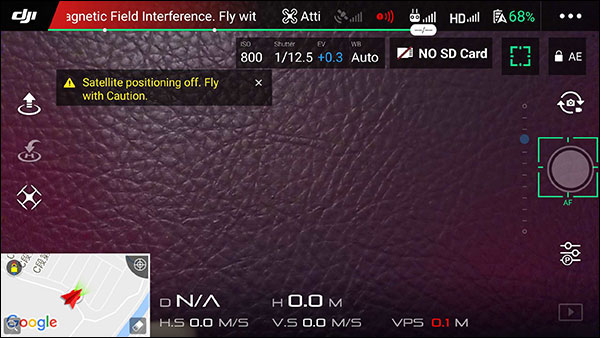
If the Landing Protection setting (see the screenshot below) is enabled on your drone (if applicable) and any 3rd party accessories are installed below the drone (e.g. extended landing gear) or are dangling below the drone (e.g. a tracker antenna), the downward sensors could detect those items as an obstacle and be triggered mid-flight.

This accidental triggering of the downward sensors could cause the drone to slowly ascend or switch to forced landing mode and start landing. A sign that this is occurring is when the VPS value at the bottom of DJI GO (see the screenshot below) is showing a value of less than several feet when the drone is high in the sky (or at least above the range of the downward sensors).
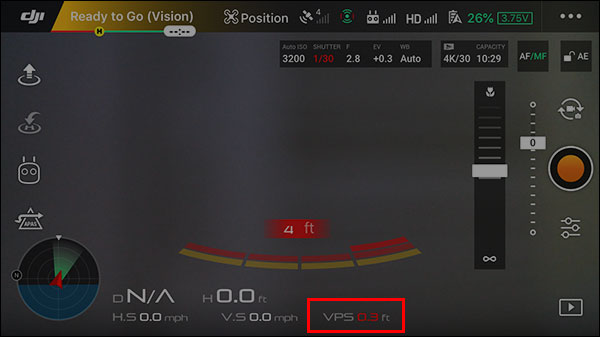
If you run into this issue, either remove the offending 3rd party accessory or disable the Landing Protection setting if you’d like to keep the 3rd party accessory installed.
In most cases, the compass does not need to be calibrated before flying (even when flying in new locations). While calibrating the compass before each flight won’t cause any issues, recalibrating often does not fix/improve anything.
See the following compass calibration guides for the best known compass calibration practices:
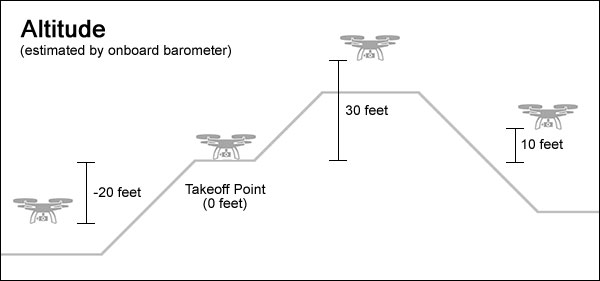
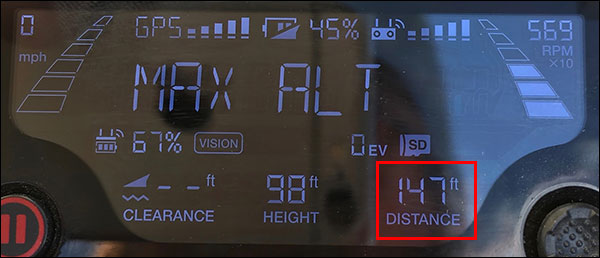
The current altitude displayed at the bottom of DJI GO shows the height above the takeoff point (not the height above the ground where the drone is currently flying).
If your drone has downward sensors, DJI GO will also display the VPS altitude at the bottom of DJI GO when the downward sensors are close enough to detect the ground (or closest obstacle) below. When the VPS altitude is showing a reading, that’s the best value to use when trying to determine how high your drone is above the closest obstacle below it.
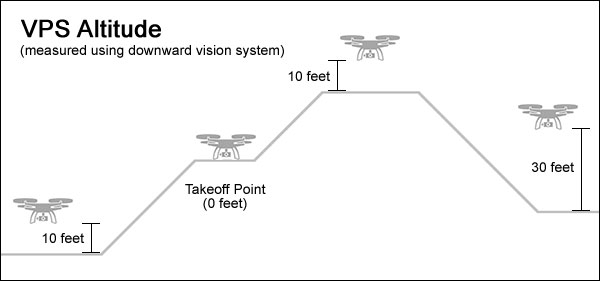
Both of these altitudes are estimated using the on board barometer (for the altitude) and downward sensors (for the VPS altitude), so you should never assume they are 100% accurate.
In many countries (like the US), the law requires hobbyists to fly within VLOS (visual line of sight). That means you must be able to clearly see the drone with your eyes at all times. Even when flying within VLOS, you could lose your drone if it accidentally lands or crashes in grassy terrain or a dense forest (for example).
Consider using some type of tracker if you’re going to be flying in a location where retrieving a lost drone might be difficult. The Marco Polo radio tracker or Trackimo GPS tracker are good options if you could potentially be tracking a lost drone from one mile or more away. The Loc8tor radio tracker is another good option that can be used to track a drone from up to 400 feet away.
These tips will help you prepare your DJI drone for its next flight:
Get into the habit of making sure the remote controller is always powered on before the drone is powered on and powered off after the drone is powered off.
When flying your drone, RTH will be initiated if the remote controller connection is lost (like when the remote controller is powered off). While powering off the remote controller shouldn’t cause any problems when the drone is on the ground, there have been rare cases where drones have lifted off and attempted to return home. So, play it safe and make sure the remote controller is powered on any time the drone is powered on.
The vision systems icon at the top of DJI GO (see the screenshot below) shows whether or not the various drone sensors are being used to detect and/or avoid obstacles. The icon will be green when the sensors are active and red when they are inactive.
If flying in poor lighting conditions, the sensors will be auto disabled. If you’re going to be relying on obstacle avoidance to help you during your flight, then double-check that the sensors are turned on and active before taking off.
When flying a drone that uses Wi-Fi (like the Spark and Mavic Air), nearby Bluetooth or Wi-Fi signals can interfere with the remote controller’s connection to the drone. That could create a weak signal, limit your max distance, and/or disconnect the signal and cause RTH to be initiated. To prevent any potential issues, enabled airplane mode on other nearby electronic devices or power them down.
When flying in cold weather, it’s important to keep the batteries warm. Store the batteries in a warm place (like your pockets) or in some kind of container that’s capable of trapping heat (like in a thermal container).
After taking off, ascend to about 10 feet and let your drone hover in place for a minute or two so the battery has time to warm up.
If your drone is connected to enough GPS satellites, the home point will be automatically set when the motors are started. DJI GO normally announces when the home point has been set (if the volume is turned up on your mobile device), but you should also look at the map in DJI GO to verify the home point has been set. The home point will appear on the map with an "H" symbol like this:
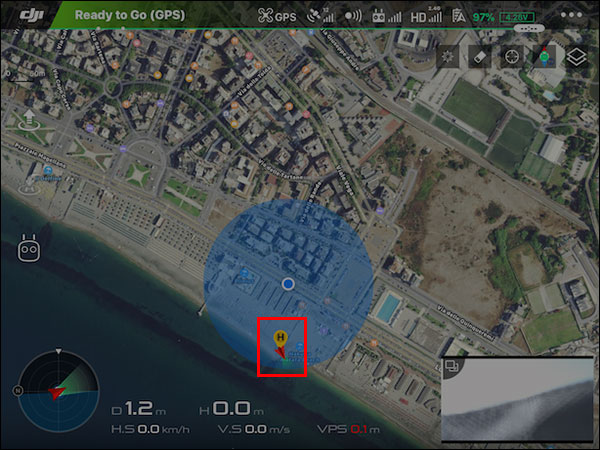
Verify that the “H” symbol is displayed on the map and that it’s in the correct location. If the home point has not been marked due to a poor GPS connection, then it would be safest to wait until it has been marked (or try manually setting it).
If you must take off before the home point can be set, the home point will be automatically set at the drone’s current location mid-flight as soon as it’s able to connect to enough GPS satellites. That location might not be a desirable landing spot, so you should manually reset the home point if that happens.
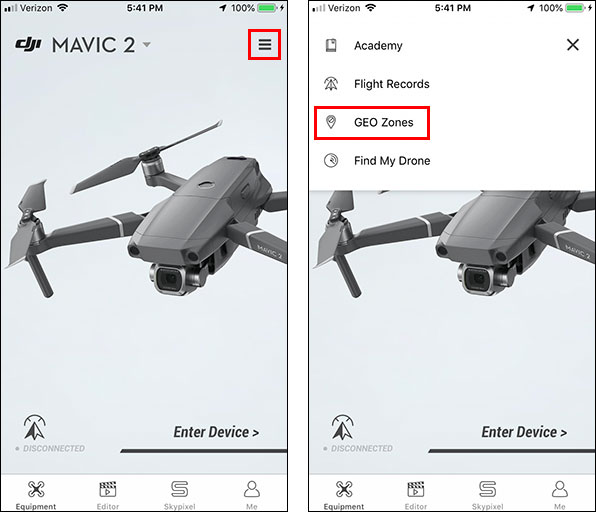
As long as the GPS receiver in the drone is connected to enough satellites, the drone will be able to track its current location and prevent you from flying into a no fly zone. If your drone manages to fly into a no fly zone while flying in ATTI mode (flying without GPS assistance) and it realizes it’s in a no fly zone after it starts using its GPS data (when switching from ATTI mode to GPS mode), it will auto land at its current location.
Check the GEO Zones map in following section of DJI GO before taking off so you’re aware if there are any no fly zones nearby:
It’s also important to make sure you do not get into a situation where a no fly zone comes between you and the drone’s current location. If RTH is initiated in that situation, the drone would approach the no fly zone and stop once it reaches it since it’s not able to fly into that location. It would then eventually auto land at its current location when the battery reaches the critically low level.
DJI firmware and software updates are optional, so don’t be in a rush to install them when you haven’t set aside sufficient time. And don’t install those updates right before heading out for an important flight (just in case something doesn’t update as expected).
After installing new updates, take the time to review everything to ensure all is ready to go for your next flight. Installing new firmware usually resets the settings on the drone, batteries, and remote controller, so double check all of your settings in DJI GO after installing new firmware.
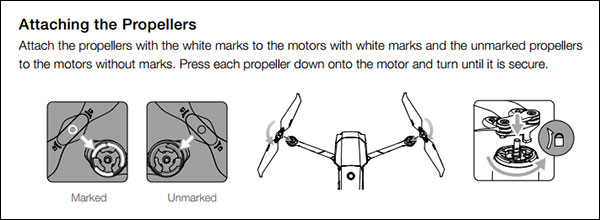
On most DJI drone models, it’s not possible to easily attach the props to the wrong motors. However, if you somehow manage to do that, your drone will most likely tip over on takeoff and the props will strike the ground.
The props and motors are color coded so you can easily match up the props to the correct motors. Your DJI drone manual will contain a section like this that explains how to attach the props:
If you don’t want phone calls, text messages, or Internet connected apps to interrupt you while flying, enable airplane mode on your mobile device before taking off.
Before flying in an unknown location, you should scout it out so you’re aware of any nearby obstacles or areas where it's not safe to fly. In many locations, Google Earth can be used to vritually fly over the area and estimate the elevation of the surrounding terrain and obstacles.
Fully charge the drone batteries you’re going to use the day before or day of your next planned flight. While it’s okay to fly with a remote controller or mobile device that’s not fully charged, you should make sure both are sufficiently charged for the flight(s) you have planned.
Flying in rainy/windy conditions can be dangerous. Make sure you check the weather forecast so you don’t accidentally get caught in a storm mid-flight.
Many DJI drones can be powered on even when the battery is not secured properly. The fact that the drone is powered on is not a sign that the battery is secured properly. It’s important to ensure the clips on the sides of the battery are properly snapped into the the drone’s battery compartment so the battery is not able to slide out mid-flight.
Before taking off, check the Return-to-Home Altitude setting in DJI GO to ensure it's set high enough for the area where you'll be flying. Find the tallest obstacle above the takeoff point, and set it to 50 feet above that height. The altitude is usually not 100% accurate, so that extra 50 feet of padding will account for any error in that estimation.
When flying with a mobile device that’s not connected to the Internet, the maps in DJI GO will not be displayed if they have not been cached (downloaded and stored locally). If you know your mobile device won’t be connected to the Internet while flying, then cache the maps in DJI GO like this in a location where you have Internet access before heading out to fly.
Having the maps will allow you to do a few vital things like verify the home point is set in the correct location on the map and see the last known location on the map via the Find My Drone feature if you happen to lose your drone mid-flight.
Magnetic metal objects that come too close to the drone will negatively affect the compass. That will confuse the drone and make it impossible for it to determine which direction it’s facing.
To avoid a potential issue, power on your drone when it’s sitting on the ground in a location that you know is free of any nearby magnetic metal objects. Keep in mind that metal could be hiding in nearby objects (like rebar in a concrete sidewalk or driveway).
Never store your drone near magnets like a subwoofer in a car or on top of a home theater speaker. That could cause the compass to be permanently magnetized until it has been manually degaussed.
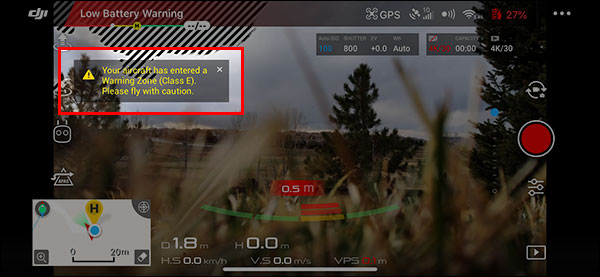
Check the status message at the top of DJI GO and make sure it’s not reporting a magnetic interference error (like in the screenshot below). If you see this warning, that’s a sign that your drone is near some type of magnetic metal object. After moving your drone to a different location, that warning message should go away.
DJI GO does not always show a warning when the compass is being negatively affected by some type of external magnetic force. So, it’s important to always do these checks before taking off:
The remote controller antennas need to be positioned as shown below so the signal remains strong between the drone and remote controller. You might need to reposition the remote controller antennas mid-flight depending on where the drone is positioned in relation to your current location.
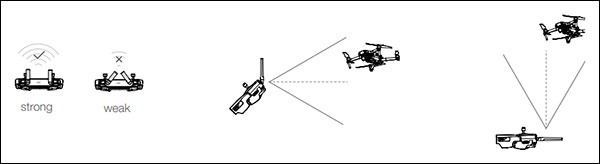
Watch this video for to see an example of how the remote controller signal is emitted when the antennas are positioned at various angles.
Carefully check the props for damage prior to each flight. Make sure the edges of the prop are not chipped or cracked and check the hub area (center of the prop) on the top and bottom for any cracks or wear. Replace any props that show any signs of damage.
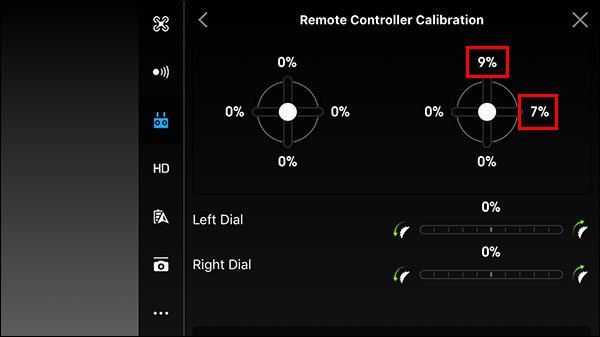
If the remote controller is not calibrated properly, the drone could drift when the sticks are in the center of the remote controller or it might not respond quite as expected when the sticks are moved.
When the remote controller sticks and wheel(s) are properly calibrated, the current stick/wheel locations will show 0% in all locations (as long as the remote controller sticks are in the center positions) when viewed in the following section of DJI GO:
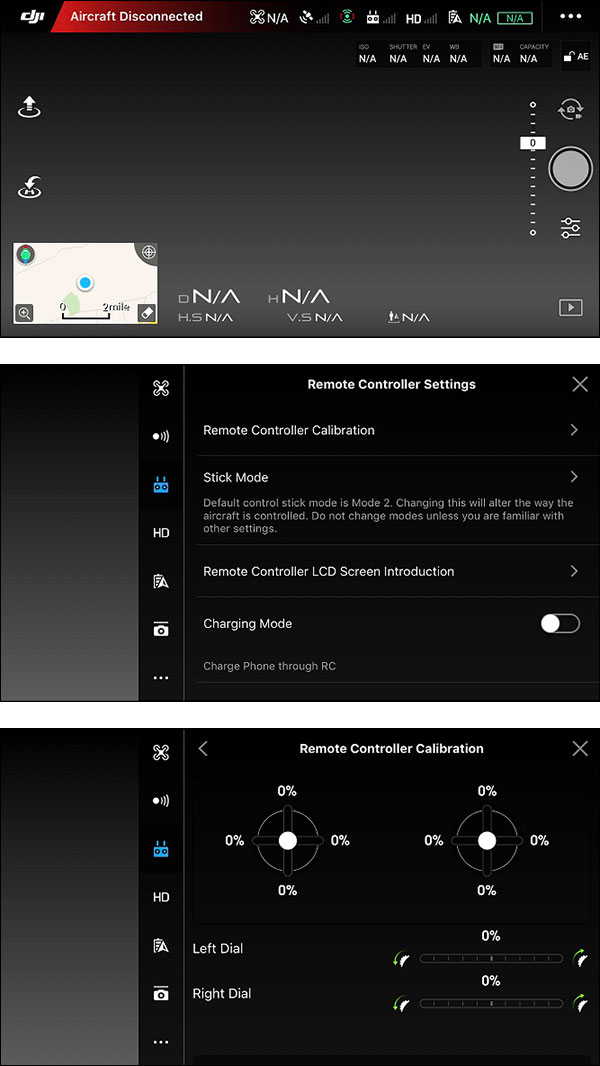
In this example, you can see the right remote controller stick needs to be calibrated:
Use these tips to safely get your DJI drone off the ground:
The ground is the largest obstacle you’ll encounter when flying. In order to get your drone away from the ground as quickly as possible, move the throttle stick to the full up position until you drone is about 10 feet above the ground when taking off. At that point, your drone will be safely hovering above the ground and you can perform any needed preflight checks.
The wind high up in the sky is usually a lot stronger than the wind on the ground. You can use the attitude indicator in DJI GO to judge the strength of the wind by how much the drone tilts as it hovers in place. Watch this video for an explanation of how to use the attitude indicator.
Your drone won’t be able to travel as fast when it’s flying into a strong head wind. If it’s flying slower than usual, that’s another indication that the wind is strong.
When flying a drone that’s equipped with Precision Landing (like the Mavic Pro and Mavic Air), you can enable the Precision Landing setting in DJI GO (see the screenshot below) to allow the drone to land closer to the marked home point when it returns to the home point automatically.
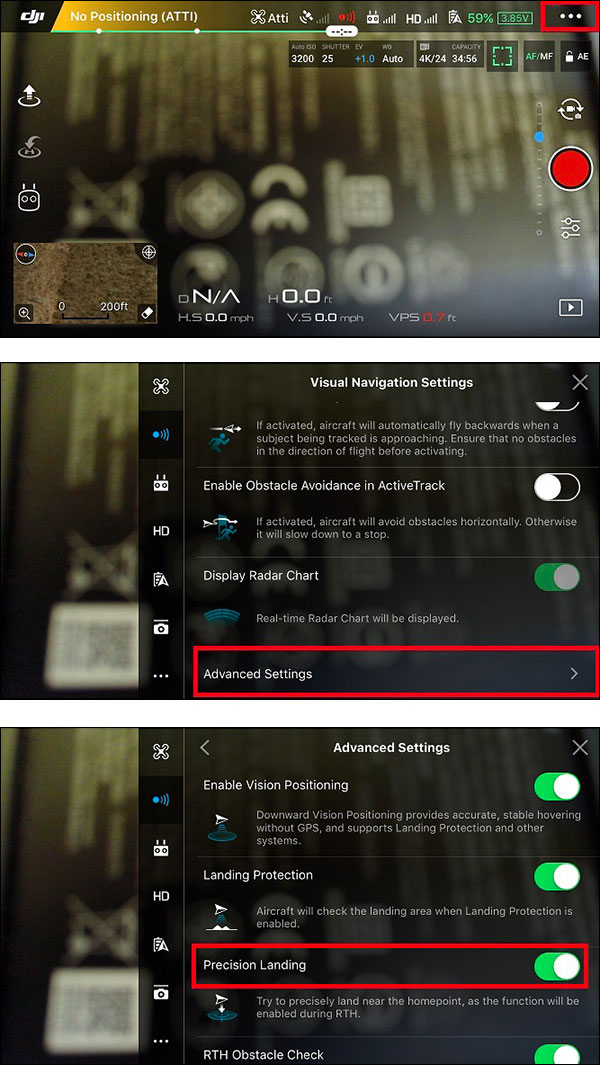
After enabling the Precision Landing setting, you just need to make sure you ascend straight up over top of the takeoff point for at least 23 feet before moving the drone horizontally. That will allow the downward vision system to scan the ground below and remember the location of the drone so it’s able to land in the same spot when it returns.
This feature could be useful if your drone gets into a situation where it needs to automatically return home and land. You might not be able to take over control in such a case, so this will ensure your drone is able to land as close to the home point as possible.
Use these tips to ensure a safe flight with your DJI drone:
If you run into trouble when flying with an automated flight mode (like ActiveTrack), toggle the flight mode switch (or sport mode switch) to quickly cancel the automated mode and take back full control of the drone. Canceling the flight mode is a better option than attempting to fight the automated flight maneuver with the remote controller sticks.
The RTH and auto land icons are right next to each other on the left side of DJI GO.
![]()
When tapping either icon, DJI GO will display a prompt to allow you to confirm the selected action. Read the prompt carefully before confirming it to ensure you did not accidentally tap the auto land icon when attempting to return the drone to the home point.
DJI drones are commonly manufactured in colors that are hard to spot in the sky. You can wrap the outside of your drone in a brightly colored vinyl skin (like a DecalGirl skin) to make it easier to see. This could also make your drone easier to spot if it crashes and/or lands in an unexpected location.
You could also attach strobe lights to the body and/or legs of your drone to make it easier to see. STROBON Cree LED strobe lights are currently the smallest and brightest lights available. Firehouse ARC lights are another good option since they use the same Creee LED lights.
The ground is the largest obstacle, so stay clear of it whenever possible. If you must fly close to the ground (or water below), make sure you can clearly see the drone with your eyes. Also, be aware that your drone might descend a little bit when flying quickly along the ground (which could be fatal when flying low).
Flying over water is just as safe as flying over ground. The difference is that it’s easy to lose your drone if it crashes into water or auto lands when flying over water.
Make sure you have sufficient battery power when flying over water and get your drone back to the home point before the battery is too low to make it back. Play it safe and take extra batteries with you so you don’t have to try using every last possible minute of battery power.
The sensors on the exterior of the drone used to avoid and/or detect obstacles are not active on all sides of the drone when using certain flight modes. Also, they can be automatically deactivated if lighting conditions are poor or the drone is tilted at an angle that prevents the sensors from pointing in the direction they are designed to face.
Carefully read your DJI drone manual so you know when the sensors are active, their effective distance, if they are only designed to detect obstacles (instead of also avoiding them), etc.
If not flying VLOS, you could easily impact other objects in the sky since the live camera view only allows you to see directly ahead of the drone. If you can see your drone with your eyes, you will also be able to see nearby obstacles.
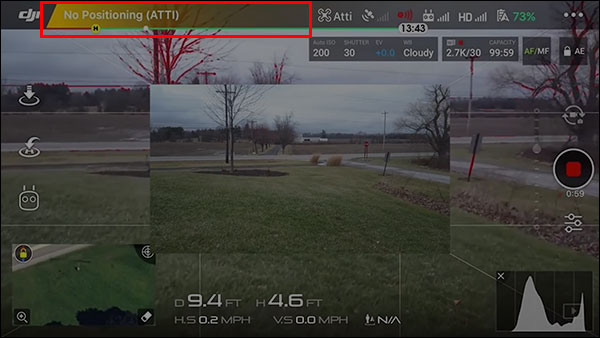
When your drone is flying in GPS mode (the default mode when it starts), it’ll be able to hover in place and hold both its vertical and horizontal position. When in ATTI mode, the drone will hold its vertical position (like usual), but will drift horizontally with the wind.
The status at the top of DJI GO will show when the drone is flying in ATTI mode.
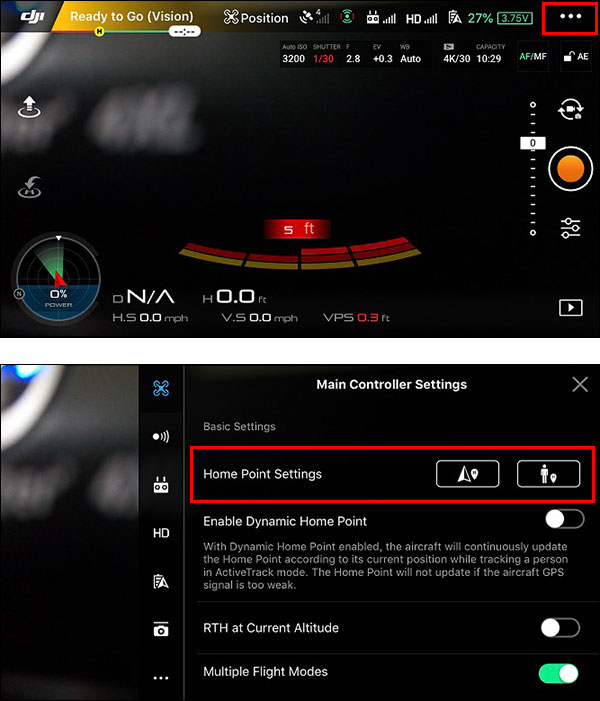
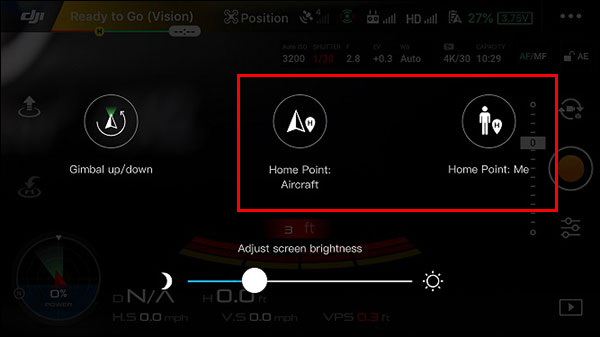
If you move away from the original takeoff point (like when flying from a boat), you should manually reset the home point (as needed) to ensure it’s in a safe landing spot. The home point can be reset to your current location (if your mobile device contains a GPS receiver) or the drone’s current location. Both of those options can be found in the following section of DJI GO:
Or swipe to the left on your mobile device screen to access those features from this panel:
The time it takes the drone to brake will depend on things like the speed at which it’s flying, whether or not it’s using GPS to hold its position, and your brake setting in the following section of DJI GO:
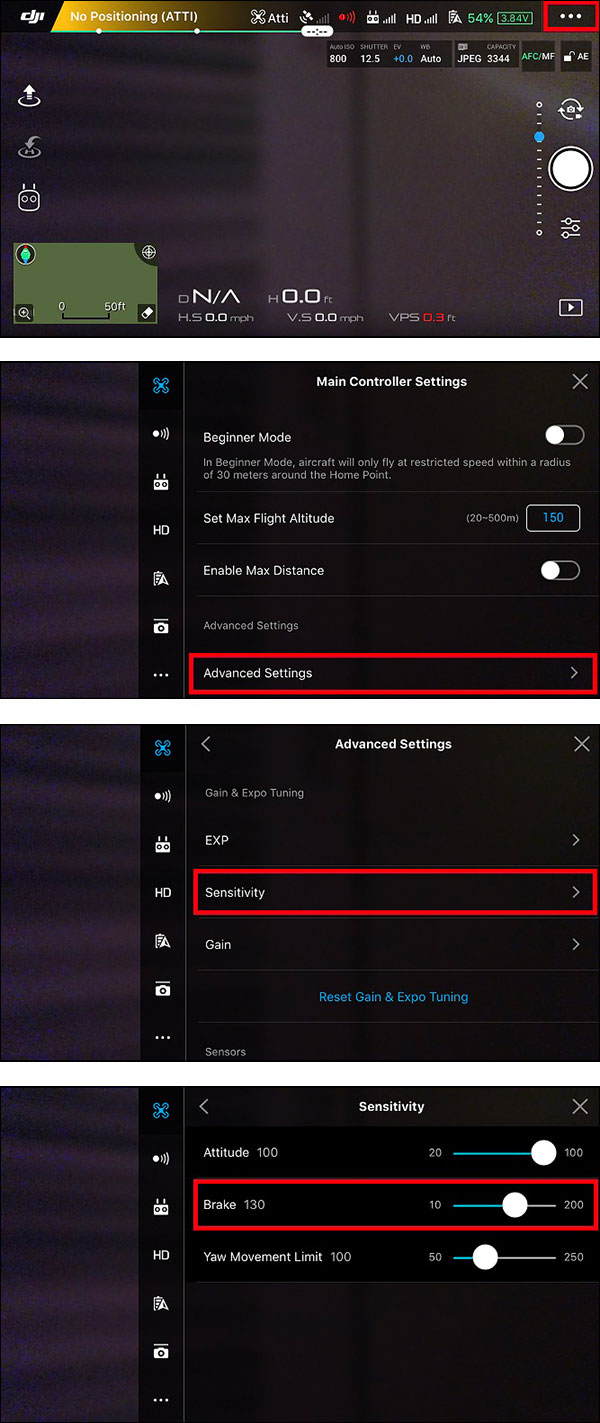
You can adjust the brake setting to make your drone stop quicker (which can be violent if you quickly let go of the remote controller sticks) or more smoothly (causing the drone to coast as it comes to a stop). Make adjustments to the brake setting while your drone is flying in the sky above all nearby obstacles so you can safely see how it reacts with the new setting in place.
The uplink (remote controller connection) and downlink (video connection) travel through different signals between the drone and remote controller. That means it’s possible for the remote controller signal to still be connected even when the live video is no longer displayed in DJI GO.
Most DJI remote controllers display a green light on the front of the remote controller while the remote controller is connected to the drone. If you’re flying the Mavic Pro or Mavic 2, the screen on the front of the remote controller will show you if the remote controller is connected.
If you run into this scenario where only the downlink disconnects, you’ll still be able to initiate RTH from the remote controller. If you cannot see your drone and you’re not sure how to pilot it closer to your location (to attempt to reestablish the downlink), then initiating RTH is a good option.
When the front of the drone is facing you, the remote controller sticks need to be operated in the opposite direction. That means forward becomes backward and left becomes right.
This can be disorienting if you’re not used to flying drones. Practice in a wide open location until moving the sticks is like riding a bike.
When the sun is shining directly into the front sensors, the drone will sometimes detect the sun as an obstacle and prevent you from flying forward. If this happens, you can work around this issue by doing one of the following:
Many countries require flying VLOS. This means you need to be able to clearly see the drone with your eyes at all times. Make sure you understand your country’s laws before flying.
Always keep the path between the remote controller and drone clear.
The remote controller signal will weaken and/or completely disconnect if an obstacle comes between the remote controller and drone. You should never attempt to fly your drone behind obstacles like a dense patch of trees or around a building.
Most DJI remote controllers display a green light on the front while the remote controller is connected to the drone. You can use that status light to determine if you still have control of the drone in a case where the downlink (video connection) drops and the remote controller is still connected to the drone.
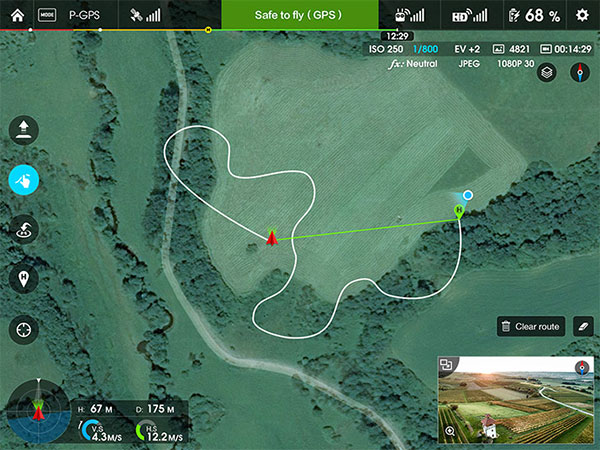
As you fly, a flight path will be drawn on top of the map in DJI GO to show where your drone has flown. If you lose sight of your drone, you can retrace that path backwards to bring your drone back to the home point.
The altitude indicator in DJI GO can be used to figure out which direction your drone is pointing. With that information, you can navigate your drone back to the home point even in cases where you cannot see it.
Watch this video for an explanation of how the attitude indicator works in DJI GO.
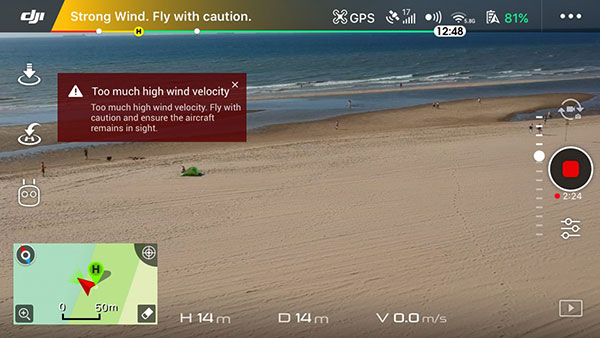
DJI GO will often display a high wind warning when it detects the drone is flying in strong winds. If you see those warnings, it’s a good indication the drone is flying in strong winds (even if the wind is calm on the ground).
When your drone is flying into a headwind, it will fly slower than usual and will use more battery power than usual. And if the wind is too strong, the drone will move further away from the home point as you attempt to fly home. If run into that scenario, descend to a lower altitude (if it's safe to do so) where the wind is not as strong and continue flying home.
If the downlink (video disconnects) disconnects and the remote controller is still connected to the drone, you can use the data on the remote controller screen (when flying a Mavic Pro or Mavic 2) to navigate your drone back to the home point.
The distance value at the bottom, right corner of the remote controller screen shows the current distance from the home point to the drone. Fly forward slowly and continue slowly yawing (turning) the drone until the distance value starts decreasing. At that point, you’ll know the drone is flying closer to the home point as it moves forward.
When the Landing Protection setting is enabled in DJI GO, the downward sensors detect the drone is close to the ground, and the throttle stick is in the full down position (all three of those things combined), the drone will auto switch to Forced Landing mode and will automatically descend until it lands. While this normally works as expected (only when the drone is actually near the ground), it could cause the drone to accidentally land in a case where the bottom sensors detect an object below the drone (e.g. extended landing gear) as the ground.
Do one of the following things to prevent a potential disaster like this from occurring:
The sensors will most likely be auto disabled or won’t be able to detect obstacles well when flying at night or in poor lighting conditions. Without the use of the sensors, the drone could crash into obstacles that it would normally be able to avoid or might not be as stable as usual when hovering near the ground.
The sensors are not able to detect small objects like power lines or small tree branches. Be aware of the obstacles in your flying area so you can manually avoid them without having to rely on the sensors.
The sensors are not foolproof. They can sometimes fail to detect obstacles that are normally easily detectable. For example, the sensors could be confused by an obstacle that is reflecting light or the sun could be shining at just the right angle to cause the sensors to malfunction.
When using any of the automated features of your drone, always be ready to manually take over if something does not go as planned. Most automated flight modes and functions can be quickly exited by toggling the flight mode switch (or sport mode switch) on the remote controller.
While your drone should not be able to fly into a no fly zone, it will auto land at its current location if it does manage to enter a no fly zone. That could happen if you take off with a poor GPS signal and then acquire a strong GPS signal after entering a no fly zone. Review the map in DJI GO (or the GEO Zone Map on the DJI website) so you’re aware of any nearby no fly zones prior to each flight.
If DJI GO disconnects from the drone, crashes, or your mobile device shuts down, the remote controller will still likely be connected to the drone. Since the drone is flown with the remote controller, you’ll be in full control of your drone as long as the remote controller is connected to the drone.
The drone uses its internal GPS receiver to track its current location. Flying under obstacles will block the GPS signal to that receiver and cause the drone to automatically switch to ATTI mode (where the drone does not hold its horizontal position). In ATTI mode, the drone could drift into a nearby obstacle when flying in close quarters.
DJI GO might display important message mid-flight, so pay attention to what is going on in the app while you’re flying.
You’ll also be able to see the current flight mode at the top of DJI GO. That’s important to monitor in case your drone automatically switches to ATTI mode (for example).
A CSC (cross stick command) is used to start the motors. It can also be used to stop the motors when the drone is on the ground or even mid-flight.
Out of the box, most DJI drones will not allow you to accidentally do a CSC mid-flight. And some drones have an alternate CSC command that must be executed in order to stop the motors when the drone is in flight.
See your DJI drone manual for more details on how CSC works on your drone.
The current altitude displayed in DJI GO is the height above the takeoff point (not the height from the ground at the drone’s current location). This altitude is estimated using the drone’s internal barometer.
If your drone has downward sensors and you’re flying close enough to the ground, the distance to the closest obstacle below your drone will be displayed at the bottom of DJI GO.
The VPS value is usually fairly accurate when the drone is flying completely level. If flying quickly in any direction, the drone will be tilted and that will skew the distance since the sensors will be pointed at an angle.
As long as the remote controller is connected to the drone, you can press and hold the RTH button (or toggle the appropriate switch if flying a Phantom 3) on the remote controller to initiate RTH. The remote controller will start beeping after RTH has been successfully initiated.
These tips will help you safely land your DJI drone:
If the battery reaches the critically low level, your drone will start auto landing at its current location. While it’s possible to steer the drone to a safer landing spot, there is no way to cancel the auto landing. Holding the throttle in the full up position will allow you to stop the drone from descending and give you time to reposition the drone for a better landing.
If you point the camera staright down, you’ll be able to quickly spot the safest available landing spot. You can think quickly navigate your drone to that location and then allow it to finish auto landing.
If using an automated landing mode, you can quickly press and release the RTH button (or toggle the appropriate switch if flying a Phantom 3) on the remote controller to cancel the auto landing when the drone is in sight. That will allow you to take over and manually land the drone.
RTH usually works just fine if the drone is landing in a wide open area, but nothing is safer than a manual landing if you’re comfortable controlling your drone. Not only will a manual landing allow you to land in the best spot, it will also allow you to gently touch down.
If you need to launch or land from a wet and/or dirty surface or in a location with tall grass (or anything that could potentially come into contact with the camera, gimbal, or props), a landing pad will give you a flat/clean/dry platform. A landing pad could also be used to create a unique pattern on the ground for Precision Landing in a case where there is no distinct pattern on the ground (like when taking off from a large grassy area).
Here are a few commonly used landing pads:
Before descending to the ground, yaw (turn) the drone so it’s facing away from you. That will likely make it easier to control since the controls feel more natural when the drone is pointed away from you.
As an alternative to using a landing pad or when landing in a location where it’s not safe to land on the ground, you can catch the drone in your hand. This can be dangerous since your hands will be close to the props, so map out a plan of action before you attempt a hand catch.
Here are a few videos that show how to safely hand catch a DJI drone:
Here are some general tips to help you safely fly your DJI drone:
Unless you’re flying in a large open building like a gymnasium, flying indoors is usually not a safe thing to do. Poor lighting, tight quarters, lots of surrounding obstacles, nearby people, and/or lack of a GPS signal are all ingredients that could result in an expensive disaster.
When flying at night, you can attach lights to your drone to allow both you and other people to easily spot your drone in the air.
STROBON Cree strobe lights are a popular option since they are currently the smallest and brightest strobe lights available. Firehouse ARC lights are another good option since they use the same Cree LED lights.
To ensure good performance when flying with DJI GO, it's important to use a mobile device that is known to work well. A list of supported and commonly used tablets and phones can be found here. For best results, choose a mobile device that has decent specs and a bright screen.
Apply these tips (for Apple devices) or these tips (for Android devices) to ensure both your mobile device and DJI GO are configured to run as efficiently as possible.
If you have any questions about any of the above tips, comment below or discuss with other DJI pilots in the DJI Drone Help forum.
Do you know anyone that flies DJI drones? If so, please share this guide with them. Also, feel free to share it in any forums, Facebook groups, or other DJI drone related places you frequent online.
